Create your first Blender add-on
I have offered lending a hand to @Coen in its very interesting path to create custom brick rowlocks in Blender using the python API and I figured I might as well create a new thread to not hinder the ongoing discussion there and maybe attract people with the same needs, share their thoughts, struggles and knowledge.
The goal of this thread is to help newcomers with a background in architecture or CAD software to rapidly prototype their ideas by making use of the blender API, especially the UI. It's not supposed to be very advanced, but rather to create a functioning environment for contained scripts and ideas without thinking about scalability. It is assumed however that you have a bit of experience in Python programming, or in any other programming language for that matter. If not, there are very good python crash courses available pretty much everywhere on the internet.
1. Adding a Panel in the interface
Blender comes pre-packaged with a host of python templates anyone can get ideas from. Within the Text editor go to Templates > Python > UI Panel Simple. A new text datablock should open with a few dozens lines of code. Click on the Play icon to run it.  .
.
Let's see what we just unleashed in the interface !
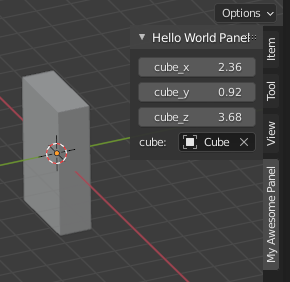
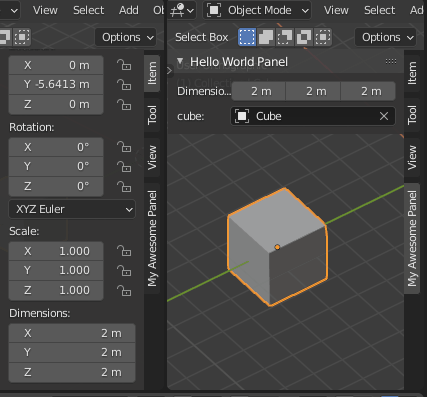
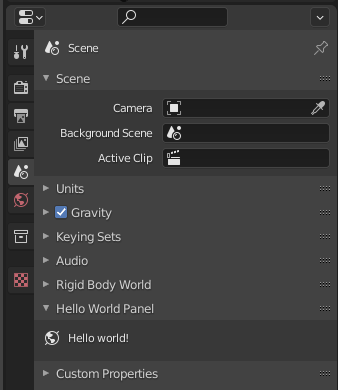
Create a new object and go into its properties. It's the orange square icon in the properties editor. There you'll see a new panel has been added to the interface.
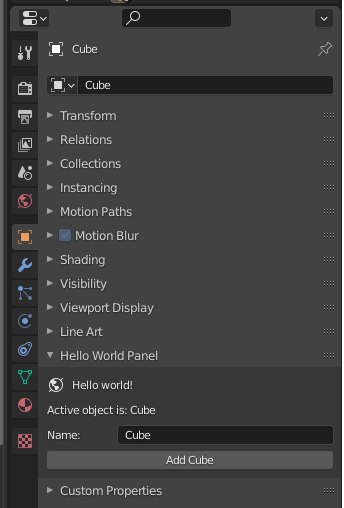
It contains 4 rows :
One label with an icon :
row.label(text="Hello world!", icon='WORLD_DATA')
One label where the object name is displayed :
row.label(text="Active object is: " + obj.name)
One String field where you can actually change the active object's name.
Depending on the object property, the field type is automatically changed to accomodate for the expected value. here the object name is a string object, so the field lets you input a string.
row.prop(obj, "name")
And finally a button (called operator in the Blender API), which creates a new Cube and selects it.
row.operator("mesh.primitive_cube_add")
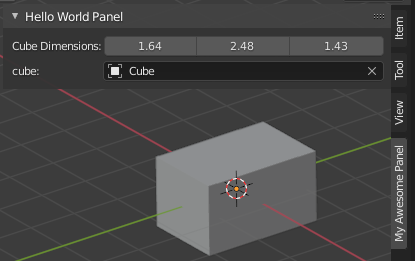
2. Moving the Panel to the 3D Viewport
I'd like to move this panel into the right hand side panel ("N" panel) of the 3D Viewport, the one you toggle with keyboard N or the tiny tiny arrow in the top right of the interface. 
It's arguably not the best place to put your addon interface because it can get crowded when you enable a lot of addons, but it's alright for prototyping . You can see in the template we just imported that a panel is created by defining a new class that inherits from bpy.types.Panel. Then after the class is defined, there is a call to bpy.utils.register_class(HelloWorldPanel). The API relies on a few instructions just after the class name definition in order to know where to place it and how to uniquely identifying in afterwards. They all begin with bl_ to note they're particular class attributes. We have :
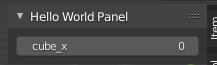
bl_label = "Hello World Panel"The panel will display like this in the interface.
bl_idname = "OBJECT_PT_hello"It will be uniquely stored by Blender using this. You can then access its properties from anywhere else in code with this identifier once it has been registered. Note that if you register multiple panels using the same idname, they will be overwritten each time and only the last one will display.
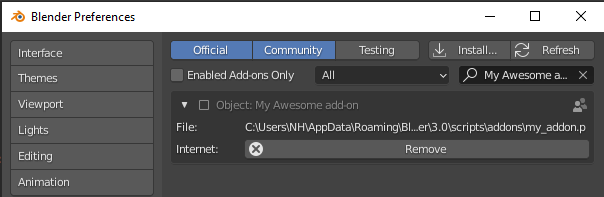
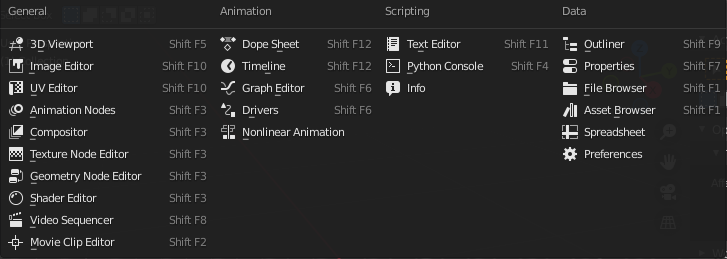
bl_space_type = 'PROPERTIES'The panel will be placed in the Properties editor. Here are all the available editors in Version 3.0 :
You can note there is an editor type you probably don't have access to, it's called the Animation Nodes editor and it comes from a great add-on. You can create custom editors with the Python API, but you're limited to a node-based editor similar to the shader editor.
bl_region_type = 'WINDOW'This is a bit trickier. You just have to know that an editor is usually divided in several regions : Header on top, Footer on the bottom, Tools on the left, UI on the right and window in the middle. There are other specific ones and they're not always used for all editors but we won't go into the details here. Usually all the regions but the window region can be collapsed.

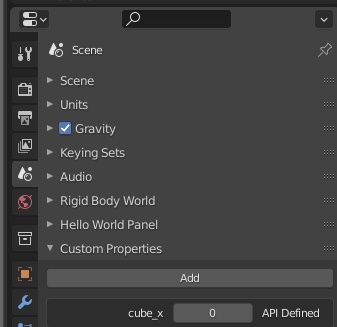
bl_context = "object"This places the new panel inside the object properties. You can place it in the scene properties, world properties, etc.
How do we place it inside the "N" panel of the 3D Viewport editor ? If you have already scripted a little bit in the Scripting workspace you must have seen blender's pseudoconsole in the bottom left corner. You'll notice that new lines appear when you click on buttons or change things in the interface. It's a great way to learn how things are called internally. Don't depend too much on it though, because not everything is printed out there, especially not all python errors, and some commands are obfuscated by design.
Back to the previous point where I explained the Properties editor has several contexts that you can add your panel to. Try clicking on the scene icon for instance and this will be printed in the console :

The rest of the explanation works best if you delete all objects in the scene. (Select > All and Object > Delete)
If you change bl_context = object in the panel definition to bl_context = scene, you'll notice that it now appears in the Scene panel.
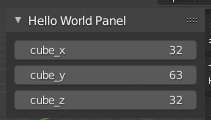
I honestly have no idea why we have to use lowercase words here when everywhere else in the code we have to use capital letters, but I'm sure there is a good reason. Also, now that we moved the panel and deleted all objects, only the first label appears, but not the others rows where we could spawn a new cube and change its name. We'll tackle that in a bit.
How do we know what is the bl_space_type of the 3D viewport ? Simple, change any editor to the 3D viewport editor and look at the console ! VIEW_3D

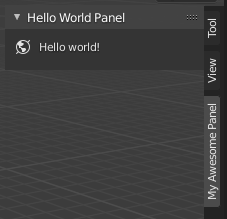
We want it to appear on the N panel, which by convention is called the UI region.
But the UI region type doesn't have contexts, it has categories. You can name your category however you'd like to.
So the few lines after the class definition and before the draw function should look like :
bl_label = "Hello World Panel"
bl_idname = "OBJECT_PT_hello"
bl_space_type = 'VIEW_3D'
bl_region_type = 'UI'
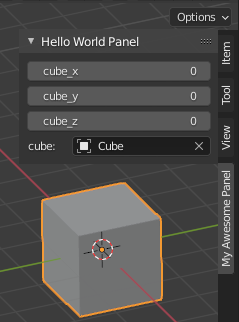
bl_category = "My Awesome Panel"Run the script again. The panel appears in the N panel !
You'll also notice the error in the console, which causes the few missing lines to not be displayed :
Python: Traceback (most recent call last):

  File "\ui_panel_simple.py", line 21, in draw

AttributeError: 'NoneType' object has no attribute 'name'


location: <unknown location>:-1
It's complaining that it can't find the name of the active object, but since we deleted all objects, we don't have an active object ! Add a new object, select it, and it all should be good.