B
by bruno_perdigao on 12 Aug 2024, edited 12 Feb 2025
#
+22 votes
Hi everyone,
We recently merged the basic implementation of a polyline tool to add walls. I'm sharing a few instructions so anyone can test and give us feedbacks. This is still early development, but the idea is that, in the future, this system will work to add all kinds of objects and annotations.
Instructions to use (there are a lot of options, so I recommend testing those in order to understand):
- Using only the mouse:
-
Select the wall tool a make sure you have a wall type selected.
-
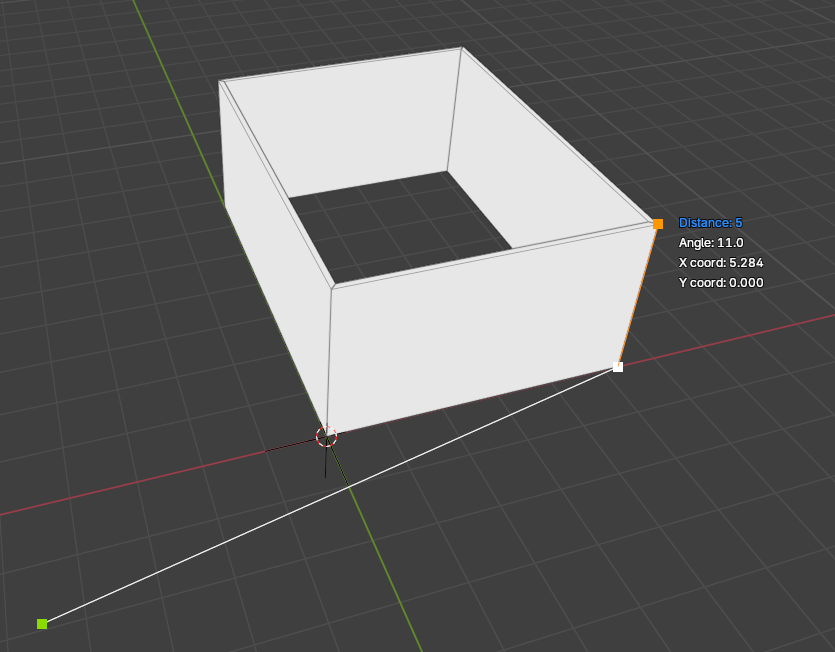
Press shift+p to start the tool. You'll get an input panel with values for x, y, distance and angle.
-
Click a few random points.
-
Press enter and the walls should be created.
- Using the keyboard:
-
Select the wall tool and press shift+p.
-
Press "TAB" to cycle through the input options. They should be highlighted in a blue color.
-
Choose the x and press 0. Choose y and press 0. Press ENTER and it should add a point in the origin.
-
Move your mouse. Notice it will snap into a few axis. Right now they are hard coded to be every 30 degrees angle.
-
When the mouse is over the axis that you want, press 7.5. You'll notice is goes directly to the distance input. Press enter and it will add a point which is 7.5m away from the origin.
-
Press enter an it should add a wall.
- Other explanations:
-
The points are always created in the XY plane with Z value of the default container.
-
You can move the mouse to snap to objects in the scene.
-
Backspace removes the last point.
-
You can also snap to existing polyline points.
-
You can press "C" to close the polyline.
-
If you hold shift while over an axis it will lock the mouse to it.
-
To use the input panel you can press "TAB" to cycle through the different values, then type the value that you want. You can also press x, y, d or a to go directly to one of those input values.
-
If you start to type a number it will go to the distance input directly.
-
The input will receive numbers, dot and simple arithmetic operations. Examples: 3.45, -3.45, 3.45 + 2, 3.45 - 2, 3.45 * 2, 3.45 / 2.
-
The input will be evaluated if you go to another value pressing "TAB" or one of values, or if you press "RETURN".
Improvements already in mind:
-
All the instructions should be on the screen when the tool is activated.
-
Support for imperial units.
-
The angles of the axis to snap should be configurable.
-
X and Y input should accept absolute or relative (to the last point) coordinates.
-
Create a temporary snap system to use points as references.
-
Improve object snap options.
-
General improvements in decorator colors, text, line weight and possible new shaders.
Please feel free to test it and give feedback!
A
by Ace on 13 Aug 2024
#
+2 votes
Brilliant! It works super well!
S
by Shegs on 13 Aug 2024
#
+1 votes
Gave it a run this morning works and I can second the fact that it works "super well." can't wait to have this applied to floors.
S
by SavyGust27 on 13 Aug 2024
#
+2 votes
Also tried it out and it works well. In me trying it there is one place where i would think it could improve. after you type in the distance, you have to hit enter twice to add the next point, it would be better if it could only be once. also, in my workflow i started using the right click to end a action in qcad, in my opinion is faster when drawing, so i think that if you could support right click to basically do the same as the enter key, it would speed up the workflow, but not sure if that possible. i will keep on trying it out
A
by Ace on 19 Aug 2024
#
+3 votes
Hi @bruno_perdigao I noticed the tool doesn't snap to lines and points when using a reference, like tracing a dxf for example, I think that is probably one of the most likely uses for this. Not sure if that is something more to do with how blender works but it would be a great feature to snap to lines and points when setting out
A
by Ace on 19 Aug 2024
#
I've just included a simple line example for testing out
B
by bruno_perdigao on 19 Aug 2024
#
+4 votes
Hi @Ace, you're right. Currently the snapping system relies on the raycast method that only work with faces. I'll try to implement this soon.
G
by GerardT on 20 Aug 2024
#
Hi, @bruno_perdigao Thank you for sharing the update on the polyline tool for adding walls.
Does anyone share a demo video of how the wall polyline tool works in Blender 4.2 and the latest version of Bonsai?
A
by Ace on 20 Aug 2024
#
+2 votes
@GerardT said:
Hi, @bruno_perdigao Thank you for sharing the update on the polyline tool for adding walls.
Does anyone share a demo video of how the wall polyline tool works in Blender 4.2 and the latest version of Bonsai?
Not yet but will record one after the Stable release comes out
B
by bruno_perdigao on 22 Aug 2024
#
+2 votes
@Ace I made the changes for the next unstable release. @SavyGust27 I've also added you suggestions for single enter pressing and right click to confirm.
B
by bruno_perdigao on 23 Aug 2024
#
@theoryshaw and others who work with Imperial Units.
I'd like your feedback on how the input system should work. I allow the user to put a length and then make an operation. For example, you can type 3' for 3 feet, or you can type 3' * 2 if you know you want the double of that, which automatically calculates to 6'. The problem is when dealing with subtraction, because the dash - character is being used to separate feet and inches, so 3' - 6" could be read as 3 feet and 6 inches or 3 feet minus 6 inches. Do you know how this is dealt in other software like Revit?
T
by theoryshaw on 23 Aug 2024, edited 23 Aug 2024
#
+2 votes
precede the calculation with a =... see attached video for an illustration
T
by theoryshaw on 23 Aug 2024
#
very cool... i saw you just pushed https://github.com/IfcOpenShell/IfcOpenShell/commit/97d2e08286bd8cadffee7e4cf8991a36a5e0759b
You might be planning on this anyway, but noticed when i entered 3' 2" that the actual wall measured 3' 1 13/32"
video:
B
by bruno_perdigao on 24 Aug 2024
#
@theoryshaw Ok, I'll check that
A
by Ace on 26 Aug 2024
#
+3 votes
As of bonsai-240826, it's really a great tool! the snapping is phenomenal and the output wall is perfect
B
by bruno_perdigao on 26 Aug 2024
#
+1 votes
@theoryshaw The precision problem should be fixed.
M
by manuvarkey on 27 Aug 2024
#
@bruno_perdigao If it is possible to use existing blender snapping settings while using the tool it would be great. I am really missing the snap to grid option!
M
by manuvarkey on 27 Aug 2024, edited 27 Aug 2024
#
Some suggestions for fixes.
- When starting the tool with shift+p, and typing zero as distance, raises the following error.
    Python: Traceback (most recent call last):

      File "/home/eee/.config/blender/4.2/extensions/.local/lib/python3.11/site-packages/bonsai/bim/module/model/wall.py", line 490, in modal

        is_valid = self.recalculate_inputs(context)

                   ^^^^^^^^^^^^^^^^^^^^^^^^^^^^^^^^

      File "/home/eee/.config/blender/4.2/extensions/.local/lib/python3.11/site-packages/bonsai/bim/module/model/wall.py", line 349, in recalculate_inputs

        self.input_panel[self.input_type] = self.number_output

        ~~~~~~~~~~~~~~~~^^^^^^^^^^^^^^^^^

    TypeError: 'NoneType' object does not support item assignment
-
Also typing 0 subsequently causes point to be inserted at current cursor but mislabels distance as 0.
-
Tool gets activated irrespective of whether wall tool is selected. This leads to error.
B
by bruno_perdigao on 27 Aug 2024
#
+1 votes
@manuvarkey Thanks for the feedback. I’ll take a look at those issues. Unfortunately is not possible to use Blender snapping system, so we are building our own from scratch. The idea is to support most of the same features, I’ll let you know when snap to grid is ready.
S
by SavyGust27 on 27 Aug 2024
#
+4 votes
are there plans to implement curves into the tool? i know that for walls, currently adding curved walls is not that intuitive, and maybe this could resolve that problem
T
by theoryshaw on 28 Aug 2024
#
Wall tool's getting tight! :)
How about when using A, and entering the angle, that it locks the axises to that angle, and then you can enter in a distance for the wall. Verses, now, when entering an angle it defaults to whatever distance is drawn out with the cursor.
T
by theoryshaw on 28 Aug 2024, edited 28 Aug 2024
#
With this new tool, i feel like tab should now reveal these originating axises (kinda like when you tab into beams) so they can be modified.
Also, this will help to post-modify a curved wall as well, once we cross that bridge.
B
by bruno_perdigao on 28 Aug 2024, edited 29 Aug 2024
#
+2 votes
@SavyGust27 said:
are there plans to implement curves into the tool? i know that for walls, currently adding curved walls is not that intuitive, and maybe this could resolve that problem
Yes, once the tool is a bit more refined.
@theoryshaw said:
Wall tool's getting tight! :)
How about when using A, and entering the angle, that it locks the axises to that angle, and then you can enter in a distance for the wall. Verses, now, when entering an angle it defaults to whatever distance is drawn out with the cursor.
Noted.
With this new tool, i feel like tab should now reveal these originating axises (kinda like when you tab into beams) so they can be modified.
Also, this will help to post-modify a curved wall as well, once we cross that bridge.
Our focus now was only in creating walls, but there should be a similar way to edit them.
C
by carlopav on 1 Sep 2024, edited 1 Sep 2024
#
Hello Bruno, I got an unexpected behavior of the tool:
Starting from this input condition I would expect the wall to be created along the line, but it's not:

PS. Is it possible to lock current direction also if it's not along x or y line?